HOW TO MOVE YOUR DNS FROM LOCAL HOSTING (ns1.nestict.net / ns2.nestict.net) TO CLOUDFLARE — WITH SAMPLES
🌐 HOW TO MOVE YOUR DNS FROM LOCAL HOSTING (ns1.nestict.net / ns2.nestict.net) TO CLOUDFLARE — WITH SAMPLES
Scenario
Your domain is:
billing.nestict.net
Your current DNS is:
ns1.nestict.net
ns2.nestict.net
You want to move DNS to Cloudflare.
🔵 1. CHECK YOUR CURRENT DNS RECORDS (LOCAL HOSTING)
METHOD 1 — WHOIS CHECK
Visit:
➡ https://who.is
➡ https://lookup.icann.org
Search: billing.nestict.net
You’ll see:
Nameservers:
ns1.nestict.net
ns2.nestict.net
METHOD 2 — Terminal / CMD
whois billing.nestict.net
METHOD 3 — DIG CMD
dig billing.nestict.net NS
Expected output:
billing.nestict.net.   3600 IN NS ns1.nestict.net.
billing.nestict.net.   3600 IN NS ns2.nestict.net.
METHOD 4 — Inside Your Hosting Panel
In cPanel / Webuzo / DirectAdmin / Plesk:
Look under:
- Domains → Nameservers
- DNS Zone Editor
- Server Info → Nameservers
Example you’ll see:
Primary Nameserver: ns1.nestict.net
Secondary Nameserver: ns2.nestict.net
🟢 2. EXPORT / COPY ALL LOCAL HOSTING DNS RECORDS
In most control panels, open DNS Zone and copy all records.
Example DNS zone (sample for billing.nestict.net):
billing.nestict.net. 14400 IN A 102.219.178.50
www                   14400 IN CNAME billing.nestict.net.
mail                  14400 IN A 102.219.178.50
ftp                   14400 IN A 102.219.178.50

; Email
billing.nestict.net.  14400 IN MX 10 mail.nestict.net.
billing.nestict.net.  14400 IN TXT "v=spf1 a mx ip4:102.219.178.50 ~all"
_dmarc                14400 IN TXT "v=DMARC1; p=none; rua=mailto:dmarc@nestict.net"
autodiscover          14400 IN CNAME autodiscover.outlook.com.

; Verification
_acme-challenge       14400 IN TXT "random-value-here"
This is the record set Cloudflare must match.
🟠 3. ADD YOUR DOMAIN TO CLOUDFLARE (AUTO IMPORT)
Steps:
- Go to https://dash.cloudflare.com/
- Click Add a Site
- Enter: billing.nestict.net
- Choose Free plan
- Cloudflare scans your DNS
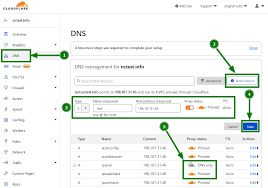
🟣 4. VERIFY ALL IMPORTED DNS RECORDS
Cloudflare Dashboard → DNS → Records
👇 Your imported records should look like:
| Type | Name | Value | TTL |
|---|---|---|---|
| A | billing.nestict.net | 102.219.178.50 | Auto |
| CNAME | www | billing.nestict.net | Auto |
| A | 102.219.178.50 | Auto | |
| MX | @ | mail.nestict.net | 10 |
| TXT | @ | “v=spf1 a mx ip4:102.219.178.50 ~all” | Auto |
| TXT | _dmarc | “v=DMARC1; p=none; ...” | Auto |
⚠️ Fix any missing records manually.
🔵 5. CHANGE NAMESERVERS TO CLOUDFLARE
Cloudflare gives you NS like:
lara.ns.cloudflare.com
tim.ns.cloudflare.com
Replace at your registrar:
❌ ns1.nestict.net
❌ ns2.nestict.net
With:
✅ lara.ns.cloudflare.com
✅ tim.ns.cloudflare.com
Propagation time: 5 min – 24 hrs
🟡 6. HOW TO MOVE EXISTING LIVE DOMAINS WITHOUT DOWNTIME
Steps:
- Add domain to Cloudflare
- Compare DNS with local hosting
- Add missing records
- Only switch nameservers AFTER everything matches
- Test website + email
- Then change nameservers
This prevents:
✔ downtime
✔ email failure
✔ broken subdomains
🟤 7. HOW TO EXPORT CLOUDFLARE DNS (FOR BACKUP OR MOVING BACK)
Cloudflare → DNS → “Advanced” → Export Zone File
This gives BIND format like:
billing.nestict.net. IN A 102.219.178.50
www IN CNAME billing.nestict.net.
mail IN A 102.219.178.50
billing.nestict.net. IN MX 10 mail.nestict.net.
🔴 8. MOVE FROM CLOUDFLARE BACK TO LOCAL HOSTING (ns1/ns2.nestict.net)
STEP 1 — Download Cloudflare zone file
STEP 2 — Import into hosting panel
STEP 3 — Change nameservers:
Replace:
❌ Cloudflare NS
With:
ns1.nestict.net
ns2.nestict.net
STEP 4 — Test DNS on dnschecker.org
🟢 9. HOW TO IMPORT ALL DNS RECORDS INTO THE TOP 10 HOSTING PANELS
1️⃣ cPanel / WHM
IMPORT DNS
WHM → DNS Functions → Add a DNS Zone
Or
WHM → Restore a DNS Zone (upload Cloudflare zone file)
EDIT DNS
cPanel → Zone Editor
CHANGE NAMESERVERS
WHM → Basic WebHost Manager Setup:
ns1.nestict.net
ns2.nestict.net
2️⃣ Plesk
IMPORT DNS
Plesk → Websites & Domains → DNS Settings → Import Zone File
EDIT DNS
Add A, MX, TXT, SRV
3️⃣ DirectAdmin
IMPORT DNS
Admin Level → DNS Administration → Import zone file
CHANGE NS
User Level → Account Manager → Nameservers
4️⃣ Webuzo
⚠️ Webuzo does not support zone file import
You must add manually.
Steps:
Webuzo → DNS Zone → Add/Edit Records
(manually add all from Cloudflare)
5️⃣ CyberPanel
CyberPanel → DNS → Create Zone
Then → Add Record
(Only manual)
6️⃣ ISPConfig
Tools → Import DNS Zone
Upload Cloudflare export
Assign to domain
7️⃣ HestiaCP / VestaCP
Hestia:
DNS → Add Record → Restore Zone (paste BIND format)
VestaCP:
DNS → Add Domain → Paste records manually
8️⃣ CloudPanel
Domains → DNS
(Manual only)
9️⃣ aaPanel
Website → DNS Manager → Add zone
Add records manually
🔟 CWP (CentOS Web Panel)
CWP → DNS Functions → Add Zone
Edit Zone → paste Cloudflare DNS one by one
🟣 10. REAL-LIFE DNS EXAMPLES (Before & After Migration)
BEFORE (Local Hosting ns1/nestict.net, ns2/nestict.net)
billing.nestict.net. 14400 IN A 102.219.178.50
www                   14400 IN CNAME billing.nestict.net.
mail                  14400 IN A 102.219.178.50

billing.nestict.net.  14400 IN MX 10 mail.nestict.net.
billing.nestict.net.  14400 IN TXT "v=spf1 a mx ip4:102.219.178.50 ~all"
AFTER (Cloudflare)
| Type | Name | Content |
|---|---|---|
| A | billing | 102.219.178.50 |
| A | 102.219.178.50 | |
| CNAME | www | billing.nestict.net |
| MX | @ | mail.nestict.net |
| TXT | @ | v=spf1 a mx ip4:102.219.178.50 ~all |
| TXT | _dmarc | v=DMARC1... |
🟢 11. HOW TO TEST EVERYTHING
CHECK WEBSITE:
ping billing.nestict.net