Deploying ERPNext on Easypanel — a Step-by-Step Guide
ERPNext is a powerful, open-source ERP built on the Frappe framework. Easypanel, on the other hand, is a sleek, developer-friendly PaaS you host yourself. Put them together and you get a hassle-free, one-click way to host ERPNext without fighting YAML files on the command line.

In this tutorial we’ll:
- Add a Compose Service in Easypanel that points to a public Git repo
- Let Easypanel build & start the multi-container stack (MariaDB, Redis, backend, frontend, scheduler, workers)
- Map our domain to the frontend container on port 8080
- Log in with the default
Administrator / admincredentials
Repo we’re using
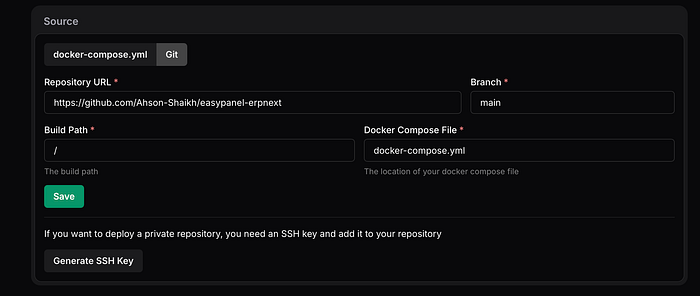
1 Create a new Compose Service in Easypanel
- Log in to your Easypanel dashboard.
- Click > Compose Service.
- Fill the Git details in Source Section:
Git Repositoryhttps://github.com/Ahson-Shaikh/easypanel-erpnext
Branchmain
Root Path/
Compose Filedocker-compose.yml
⏱ Build time: first run takes 5–7 min depending on your bandwidth. Subsequent deploys are much faster thanks to Docker cache.
You can watch live logs under Deployments → Overview. When it flips to Running, all containers are up.
2 Expose the frontend on your domain
- Go to Domains in the left sidebar.
- Click the domain (or add a new one).
- Change Service to the one you just created.
- Port → 8080 (the frontend container listens there).
- Open the domain.
- If even after 5–7 minutes, ErpNext is not opening up, hit deploy again and then open after 30s-60s.
3 First login to ERPNext
Open https://<your-domain> in the browser. You should see the familiar ERPNext login screen.
- User:
Administrator - Password:
admin
✅ Tip: The first login triggers ERPNext’s setup wizard. Fill in company name, fiscal year, default currency, etc.